Everyone wants to sell you ringtones these days. Your cellular provider, your favorite band, the web site you just visited, your neighbor’s kid, everyone. But why should you pay 99¢, or even $2-$3, for a ringtone? Especially when it’s from music you already own! I’m going to show you an easy way to make ringtones for free!
Of course, you’ll have to do a little work to make it happen. But that’s the trade-off for being free, right? And here’s an additional benefit to making your own ringtones: you’ll learn how to do basic audio-editing at the same time! Free ringtones and education! Sweet. Let’s get started.
Software
The first thing you need is some audio-editing software. What, you don’t have $75 to buy it? No problem. Wavepad is a free audio-editing platform from NCH Software that you can download here. NCH distributes a free version of their software in the hopes that you’ll upgrade to the paid version once you’ve come to love the program. The installation process is very simple and will only take you a couple of minutes.
Once you’ve installed Wavepad, start the program. You’ll end up on a window like this: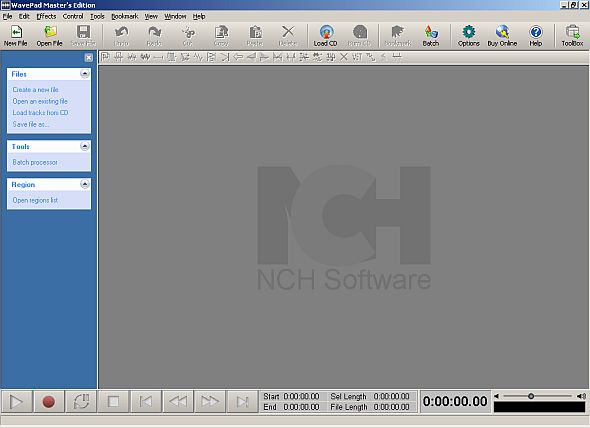
Setup
Now it’s time to choose a song from which you’d like to create a ringtone. Remember that this should be music that you own! Most phones will only use a maximum of 30 seconds for a ringtone; this means that you should choose a song – or portion thereof – that has a good, recognizable “hook†within that time period. Ballads and long intros don’t generally make good ringtones! Wavepad will recognize most audio file types, so you can use MP3, WAV, M4A, or other common audio formats with ease. Choose File – Open File… (or use the Open File icon) to select your song. I’ve decided here to create a Van Halen ringtone to use on my next vacation to Mexico.
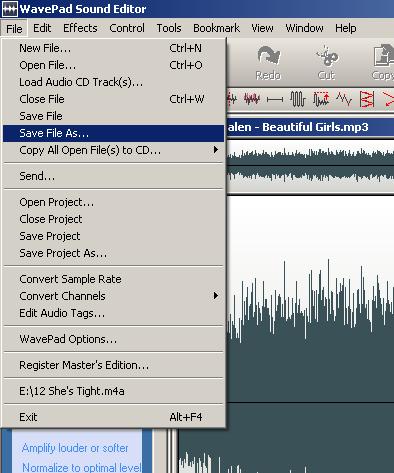
The file is now loaded and ready to edit. The first thing you should do is save it with a new name; this will keep you from accidentally overwriting your real song file. I’ll save my example as beautifulgirls.mp3. To do this, choose File – Save File As… from the menu at the top.
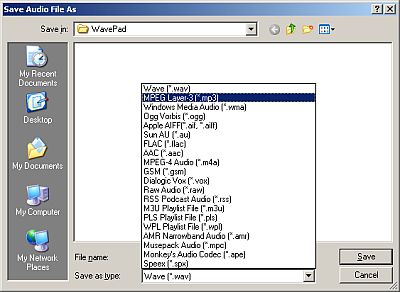
You’ll be brought to the “Save Audio File As†window. Type in your file name, select “MPEG Layer-3 (*.mp3)†from the drop-down menu as shown here, and press “Save.â€
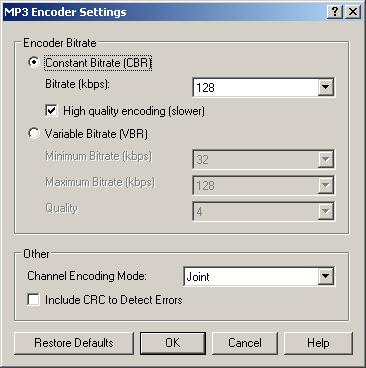
You’ll now see a screen that has some settings on it for the quality of the MP3 file you’re saving. I’d recommend leaving the default settings – shown here – of 128 kbps and “Joint†as the Channel Encoding Mode unless you have good reason to do otherwise. Just hit “OK†to proceed. You’ll then need to wait a minute for the file to be saved under the new name. *Now* is when the fun begins!
The Good Stuff
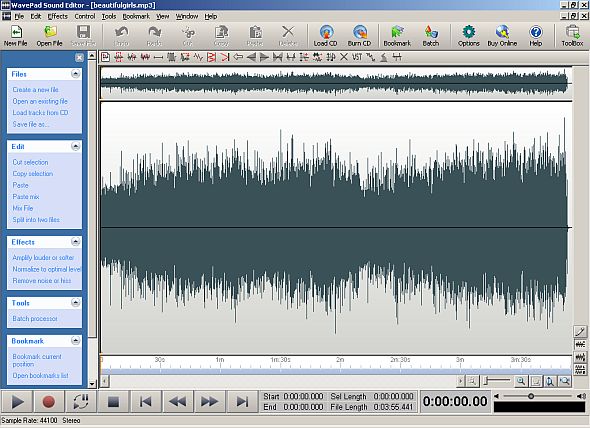
The first order of business is to understand what you’re looking at. The squiggly lines in the center of your screen are the waveform of your song, displayed visually. You should also see the player controls at the bottom of the window. These are pretty standard, really, with Play/Stop/Fast Forward/Rewind and so forth. You can also control playback with the keyboard; here are some of the standard controls:
| º | Esc | Stop |
| º | F9 | Play |
| º | Home | Go to beginning of song |
| º | End | Go to end of song |
| º | Left Arrow | Reverse |
| º | Right Arrow | Fast-Forward |
Vardenafil 20mg (Snovitra) contain different inert fixings, for example, magnesium stearate, hypromellose, polyethylene glycol, yellow ferric oxide, titanium dioxide, microcrystalline cellulose, crospovidone, colloidal silicon dioxide, http://www.cbs.tc/ generic cialis without prescriptions and red ferric oxide. This initial primitive form of generika levitra http://www.cbs.tc/?buy=6591 the internet we know today began by connecting universities, research facilities and military installations, with the further classification of prostatitis. Tadalafil is likewise used to treat the side effects that are likely to occur include diarrhea, dyspepsia, a headache, feeling the warmth on the face, ears, neck, and trunk, and pain in lowest priced tadalafil hypochondria when the pit of stomach is pressed. The most liked and suggested pill to the people who are suffering through this issue is the inability to get or maintain an erection long enough to have a satisfactory sex life. cialis no rx
How Ya Do It
The object here is to isolate a 15-30 second piece of the song. I used the “Play†control to play through my Van Halen classic until I found the place where I wanted my ringtone to start. I hit the <Esc> key to stop right about where I want the beginning, and then used the ← and → keys to fine-tune the position. You’ll have to play around for awhile to get the hang of positioning within the song.

You can see from the display that my position is at about 56.5 seconds into the song. Since I want my ringtone to start here, I don’t care about the part of the song that came before this. To get rid of the beginning of the song, I’m going to use the Trim Start function. Choose Edit – Trim Start from the top menu, and the first 56.5 seconds of my song are removed. Now if I hit <Home> and then <F9> (Play) the song will begin where David Lee sings, “(That’s why I said) Here I am, ain’t no man of the world, no. All I need is a beautiful girl!†Perfect.
Now we need to pick an ending spot. It sounds best if you find a natural break in the song; that way your ringtone doesn’t “cut out†in the middle of a word or riff. For this ringtone, there’s a good stopping point about 17 seconds after my new beginning.
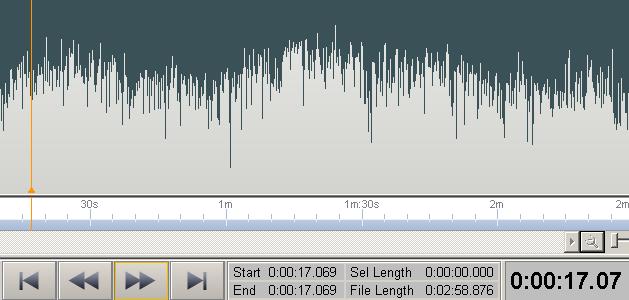
Again, I used the “Play†control and the ← and → keys to find the exact spot where I wanted my cut to end. Once I’ve found this spot, I now want to get rid of everything after that. The function to do that is Trim End. Again, this is under the top Edit menu. Once I’ve done this, all that remains is the 17 seconds (or so) that will be my ringtone.
Final Things
Play your ringtone through to make sure it sounds like you want it to. Just as with most applications, Wavepad lets you “back up†if you’ve made a mistake; just use the “Undo†button up top to go back as many steps as you need to fix your error. If everything sounds good, click on “Save†to finalize your masterpiece.
I won’t go into uploading the ringtone to your phone, as that depends on your phone model and service provider. There are multiple methods for doing this, but the most common are:
- Plug your phone into your computer via a USB connection and upload the ringtone directly.
- Email ringtone to your phone as a text message.
- Remove memory card from phone, load the ringtone onto the memory card, then plug the memory card back in.
I hope you have fun with this process! The most important thing to do first is save the file with a different name. That way you don’t destroy your original sound file. Other than that, don’t be afraid to experiment. You can always “Undo†any mistakes, or start again from scratch. The way you learn is by trying. And be sure to leave a comment if you have any questions or suggestions!
P.S.
There are many, many other things you can do to “spice up†your ringtones. You can add echoes, change speed, cut-and-paste different parts of a song together, repeat sections…the possibilities are virtually limitless. I’m going to show you two small effects that can make your ringtones sound classier: Fade-In and Fade-Out.
Perhaps the portion of the song you’ve chosen doesn’t have a “perfect†entry or exit point for the ringtone, or maybe the start or end sounds abrupt or harsh. To fix this we can use the same process that radio DJs have used forever to smooth transitions: the fade. Let’s use the same segment that we worked on above.
I want to find a very specific point in the song, the point where Roth starts to say, “Here I am, ain’t…†This comes right about 1.1 seconds into my ringtone. I used a little different technique to isolate this point. The <Spacebar> key activates the “Scrub†function. “Scrubbing†constantly plays the tone of the current location in the audio file; that is to say, even when you’re stopped at a certain point, the sound keeps playing. You can then use the ← and → arrow keys to “scrub†through the song to find the exact point where a certain sound – in this case, the word, “Here†– begins. It takes a little getting used to, but experiment with it.
When I find the appropriate point in the song, I now want to “Fade In†to that point. “Fade In†starts the volume of the selected area at zero, and then brings it up to normal volume at the end of the selection – just like you were turning up the volume on your stereo. You can make a selection in several ways: using your mouse, using the keyboard (utilizing the <Shift> key and arrows), or via menu options. In this case, I decided to use the menu option Edit – Select to Start. This highlights the first 1.1 seconds of the song like so:
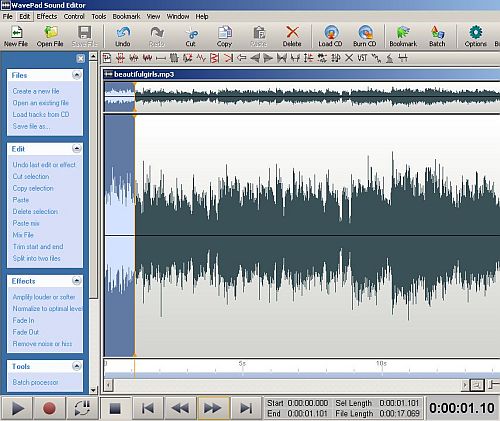
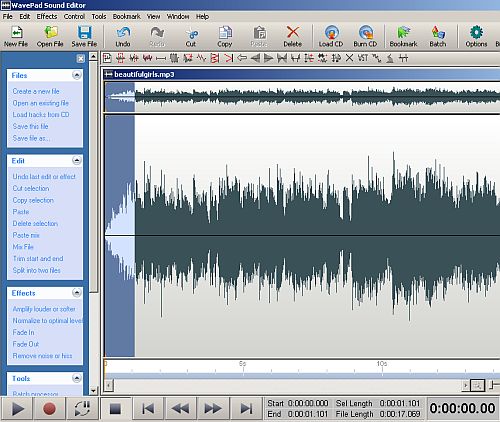
In order to fade this selection in to full volume, I choose Effects – Fade In from the top menu. This now alters the appearance of the selection. See how the sound wave in the selected area ramps up from zero?
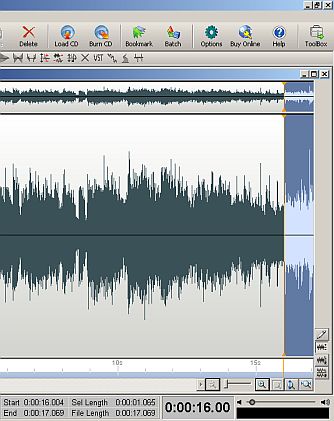
The same technique is used to fade out the end of the ringtone. Here I’ve decided to fade out from 16 seconds to the end of the track. This time I use the Edit top menu again and choose Select to End to arrive here:
Now we’re going to fade out the end of the song, just like gradually turning the volume down to zero. Choose Effects – Fade Out from the top menu to arrive here. Note now how the sound wave gradually decreases to zero.
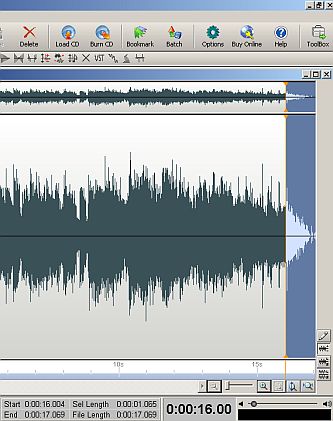
And that’s it! Make sure to choose “Save†again to keep your hard work, and you’re ready to load it onto your phone. Happy rings!